Action - Send Email
 You
can send emails automatically by creating a macro with a Send Email
action. So you can send an email that lets you know when a sensor is
tripped, or send you a reminder email at a certain time, or even send a list of
all the times a trigger was tripped since the last time it emailed you about it.
You
can send emails automatically by creating a macro with a Send Email
action. So you can send an email that lets you know when a sensor is
tripped, or send you a reminder email at a certain time, or even send a list of
all the times a trigger was tripped since the last time it emailed you about it.
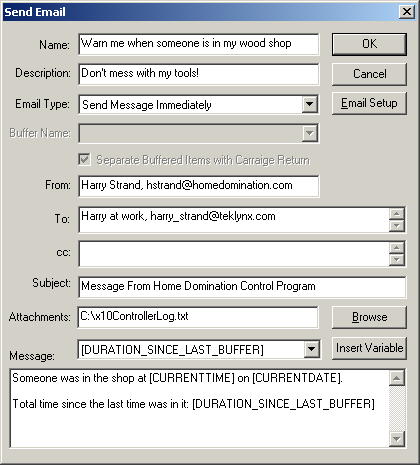
Name - This should be a brief description of the
action. This is displayed in the action list so put something here that
helps you figure out what this action is for. It puts a default there for
you in case you're not very creative.
Description - If you like to be wordy, this field is
where you would put all the nitty-gritty details about the action that you think
are important. This field shows up in the selection list too, but
otherwise isn't used.
Email Type - If you just want to send an email right
away, you can set this to "Send Message Immediately". If you
want to send an email that lists all the times that a sensor was triggered, you
would add a Send Email action when the sensor is tripped and set this to
"Buffer the Message" and type in a name for the buffer in Buffer
Name. Then you would create another macro (usually would be triggered at a
certain time of the day) and set this to "Send Buffered Message
Immediately", and set the Buffer Name to the same name as the one you used
in the Send Email action set up as "Buffer the Message".
Email Setup Button - Before
you can send any email, you first need to set up Home Domination with
information about your email account. You can do this under the setup
window, or just click this button. Click here
for more information about the Email Setup button.
Buffer Name - This is only enabled if the Email Type is
set to "Buffer the Message" or "Send Buffered Message
Immediately". When a message is buffered, all messages are stored
under this name. Later when doing "Send Buffered Message
Immediately", this lets you select the appropriate buffered messages to
send.
Separate Buffered Items with Carriage Return - This is
only enabled if the Email Type is set to "Buffer the Message".
This indicates whether or not it should append a carriage return after each
buffered message, or if all the messages should be one after the other on the
same line.
From - This will be the reply to address on the
email. If you just put an email address, it will display the address to
the person receiving the email. If you put a name, then a comma, followed
by the email address, the person receiving the email will only see the name on
the email, and will have to double click the name to see the email address.
To - Put each email address that the message is to on the
To: line and separate each one with a semicolon ( ; ). You can also put a
display name for each item by having the display name first, then a comma, and
the email address.
cc - If you place email addresses here, they will show up
on the cc line of the email. Separate email address with a semicolon ( ;
). You can also put a display name for each item by having the display
name first, then a comma, and the email address.
Subject - This is the subject of the email. It can
be blank, but it is a good idea to put something here so the person receiving
the email knows what it's about before opening the email.
Attachments - If you want to add attachments to the
email, include the path and filename of each attachment, separated by a
semicolon ( ; ). You click the Browse button to find the file you
wish to attach and it will add the path and file name to the list for you.
Insert Variable - You can insert variable information
(information that is determined at the time the email is processed) by
positioning the cursor to the appropriate place in the message box, selecting
the type of variable to add, and then clicking Insert Variable. The
variable will be added at the cursor position in the message box. The
current date, current time, or the time elapsed since the last time data can be
put into the message.
Message - This is the edit box where you can type your
message. You may put carriage returns in this text, and you can also
insert variable information at the cursor position by selecting the appropriate
variable in the combo box above it and then clicking Insert Variable.
Home Domination Home
Page