Sensor Settings
 This window
is where you enter information about a sensor. A sensor is anything that
can generate an X10 code, such as a motion sensor or X10 compatible remote
control wall switch; or anything whose status can be monitored with an IO board
(such as a U401, U421, U421-SC3 or U451 board).
This window
is where you enter information about a sensor. A sensor is anything that
can generate an X10 code, such as a motion sensor or X10 compatible remote
control wall switch; or anything whose status can be monitored with an IO board
(such as a U401, U421, U421-SC3 or U451 board).
For the Name field, enter something that briefly and
uniquely describes the sensor. Use the Description field if you
have any more information you want to put about the sensor. These fields
will show up in the selection list and in the log file.
Some kind of interface device is needed to get the status of a
sensor. This is normally set up when you first create your control file,
however it can also click Device Setup to add, remove or configure these
devices. When add a sensor, you need to specify which type
interface device (Device Type) to use. Depending on what kind of
device you are using, there may also be more than one device for that type of
interface, so make sure you select the appropriate Device for the one you
want to use with this sensor.
A couple fields will look different depending on which device
type you select. If an X10 type of computer interface is used, such as the
CM11A, it will show House Code and Unit Code. These are the
codes that uniquely identify this sensor. Make sure the sensor is set up
to this house code and unit code as well.
If the Show in Activity List check box is checked,
then when the sensor is triggered, it will show it in the log on the main
screen. If a sensor is triggered frequently, you may want to un-check this
box so it won't clutter the log. This is checked by default.
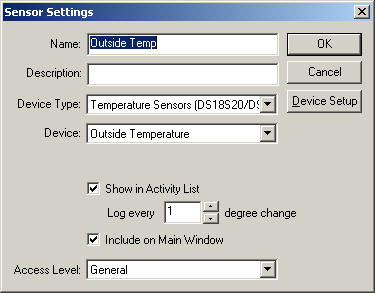 If
a device type of a temperature sensor such as the DS18S20 or DS18B20 is
selected, then the House Code and Unit Code fields will disappear and a new
field under "Show in Activity List" will appear. Log every n
degree change lets you choose how often to log changes that happen with the
temperature sensor. If 1 is selected, then every time the temperature
changes 1 full degree since the last time it was logged, it will log it
again. You can also have it log even more often by putting a decimal point
in front of the number (for instance, log every .2 degrees). And you can
have it log less often by specifying a larger number.
If
a device type of a temperature sensor such as the DS18S20 or DS18B20 is
selected, then the House Code and Unit Code fields will disappear and a new
field under "Show in Activity List" will appear. Log every n
degree change lets you choose how often to log changes that happen with the
temperature sensor. If 1 is selected, then every time the temperature
changes 1 full degree since the last time it was logged, it will log it
again. You can also have it log even more often by putting a decimal point
in front of the number (for instance, log every .2 degrees). And you can
have it log less often by specifying a larger number.
If the Include on Main Window is checked, then it will
appear on the "Sensors" tab. The sensors tab allows you to see
what sensors have been triggered recently. It can also manually be
triggered from that window so you can simulate the sensor being triggered.
By default, it will be shown in the sensors tab on the main window.
The Access Level field indicates the access level a user
must have in order to control the sensor. For instance, if the access
level is "General", and a user's item access level is
"Limited", they will not be able to trigger the sensor from the
Sensors tab on the main screen or from the network client, where if the user has
an item access level of "General" or Privileged", they will be
able to trigger it. If the access level is set to Privileged, then only
people with an item access level of "Privileged" will be able to
trigger the sensor.
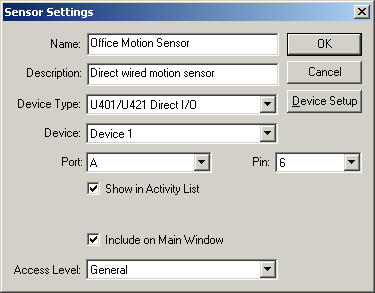 If a device type of
an IO board like the U4x1 Direct I/O is
selected, then a Port and Pin will be shown instead of a House
Code and Unit Code. The sensor will be for a particular port and pin on
the IO board. If the port is set to represent an entire byte rather than
individual pins, then the pin field will not be shown. The value for the
port will be between 0 and 255, where if each individual pin is used, the value
can only be 0 or 1.
If a device type of
an IO board like the U4x1 Direct I/O is
selected, then a Port and Pin will be shown instead of a House
Code and Unit Code. The sensor will be for a particular port and pin on
the IO board. If the port is set to represent an entire byte rather than
individual pins, then the pin field will not be shown. The value for the
port will be between 0 and 255, where if each individual pin is used, the value
can only be 0 or 1.
Home Domination Home
Page