Log Setup
 Ever wonder what goes on in your home when you're away?
Although you have to use your imagination a little bit, the log file can give
you a pretty good clue about what happened in your house and when. Even
though the log file only shows you what X10 commands were sent and received and
what macros were triggered, it can still give you a picture of what went on
during the day. "Everyone left for work or school by 8:00, at 4:00
the kids got home from school, at 4:15 the kids went outside to play ball, at
4:20 the ball went through the bedroom window, at 5:20 parents arrived at home
to greet panicky kids, and at 5:21 irate parents go into the bedroom to check
out the damage." You get the picture.
Ever wonder what goes on in your home when you're away?
Although you have to use your imagination a little bit, the log file can give
you a pretty good clue about what happened in your house and when. Even
though the log file only shows you what X10 commands were sent and received and
what macros were triggered, it can still give you a picture of what went on
during the day. "Everyone left for work or school by 8:00, at 4:00
the kids got home from school, at 4:15 the kids went outside to play ball, at
4:20 the ball went through the bedroom window, at 5:20 parents arrived at home
to greet panicky kids, and at 5:21 irate parents go into the bedroom to check
out the damage." You get the picture.
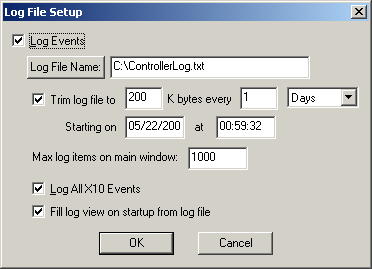
In order for anything to be logged at all, you need to click the
Log Events check box. So if you want to make sure there isn't any
record of your shenanigans, then uncheck this box and disregard the rest of
these fields.
The Log File Name is the file where everything will be
logged. If you want to browse for a location for the log file, just click
the Log File Name button to the left of the edit box. That will display a
browse window where you can navigate through existing directories on your
computer. When you click OK, it will display the file name you selected in
the edit box.
The log file could get pretty large over the years if you never
cleaned it up. However hard drive storage is cheap and plentiful, so maybe
you want to keep a record of every move you made for the last year. If
that's the case, then just uncheck the Trim Log File check box.
Otherwise read on. You can choose to limit the file to a certain
size. This size is in kilobytes, so if you want it to be limited to 1 meg,
you would enter 1000 kilobytes. You can choose how often to trim the log
file too. You have the option to trim it once per hour or every 300 years
(the latter would be a bit useless), starting on the date and time you
enter. You should probably enter a time when there is low activity or it
may delay a macro if it's busy trimming the file at that time. It trims it
quickly however. It will trim off the oldest records first.
You need to specify the max log items to show on the main
control window since if that were unlimited, you would eventually run out of
memory and the machine would likely crash or run extremely poorly. Most
computers have a lot of memory, so you can probably make this reasonably high if
you like, just don't get it in the millions or you're likely to have
problems.
If you want to see all the X10 signals that go through the wire,
check the Log All X10 Events check box. If you get sick of seeing
that stuff, just uncheck it and all you'll see is macro activity and error
messages if there are any.
When you start up Home Domination, it will immediately start
logging stuff to the log file. However if the Fill log view on startup
from log file is not checked, then you won't see any of the log data that
happened the last time you ran it. That's not all bad since if you don't
want to see that stuff, then it's less cluttered. However if you do want
to see the log messages from the previous time the program was run, you should
check this check box.
If you make changes to this dialog and want to save the changes,
click OK. If you don't want to keep any changes you may have made,
click Cancel.
Log File Format
If you're not a techno geek, the rest of this page is not for
you. But if you are a techno geek (don't worry, I know you're cool), then
you may want to perform some magic of your own with the log file that gets
created. I know you're smart enough to figure out the format of it on your
own, but everything always takes at least twice as long as you think it will,
and a little information would sure speed up the process. So here's a
description of the format of this file. If you notice that this format is
out of date, please email support@homedomination.com,
but we'll do our best to make sure it's current.
The log file is comma separated with the following fields in
each, in this order:
Type - The type identifies the type of message. In
Home Domination, each of these different types show a different picture in front
of it. Here's a description of each one:
0 - Undefined: This shouldn't normally appear in the
log.
1 - Info: This type of message is simply to give information.
2 - Warning: Indicates that something may be wrong, but the world isn't
likely to end.
3 - Error: Gak! Blurp!! Something's wrong!!! Help!!!
4 - Received: Some information is received by a controller.
5 - X10 Received: Some information was received by an X10 Controller.
6 - Sent: Something was sent to a controller.
7 - Macro: A macro was executed.
8 - Email: Something having to do with email was done.
9 - Sound: A sound was played.
10 - Video: Something to do with video happened.
11 - Temperature: A message regarding temperature was displayed.
12 - Users: Some activity was reported for some remote network client
users.
13 - User Message: A remote network user added a log message.
14 - Debug: Messages that don't normally appear unless debug messages
are turned on in the registry.
Source - This indicates what type of process generated
the message. It can be one of the following values:
0 - Not Applicable: This means that the source
doesn't apply for this message.
1 - Macro: This message was generated as part of a macro.
2 - Main Control: This message was generated as part of the main
control process.
3 - Remote Client: This message was generated because of something
related to the remote network client.
4 - Video: This message was generated by something related to video.
5 - Email: This message was generated by something related to email.
Msg Id - A numeric id representing the message.
This may not always be unique, however, any message that shares an id should be
similar.
Date - This is the date that the message was
generated.
Time - This is the time that the message was generated.
Name - This is generally the name of a sensor, switch or
macro.
Id - If this is used, it is usually the house code and
unit code of an X10 sensor or switch along with the controller type and device
name.
Message - This is an informative description of the event
or problem.
Function - For sensors or switches, this will be one of
the following codes, otherwise it will usually be 254, which indicates that this
field should be displayed as blank. These codes aren't as nice and neat
because they use the actual codes that are sent by X10 devices:
0 - All Units Off
1 - All Lights On
2 - On
3 - Off
4 - Dim
5 - Bright
6 - All Lights Off
7 - Extended Code
8 - Hail Request
9 - Hail Acknowledge
10 - Pre-set Dim (1)
11 - Pre-set Dim (2)
12 - Extended Data Transfer
13 - Status On
14 - Status Off
15 - Status Request
16 - Toggle On/Off
17 - Temperature
Data1 - This is generally only used for dim and bright or
temperature messages.
Data2 - This is reserved for future use.
Home Domination Home
Page