Macro
 So you want to do some really cool stuff, do you? Well,
you came to the right place. With a macro, you can control switches, play
sounds, take snapshots, send emails, and lots of other fun stuff. You can
do everything one right after the other if you like. When will this
happen, you might ask? You can set it up so that the macro starts when a
sensor is triggered, or at a particular time. If you set it up to run at a
particular time, you can have it run again and again on a particular day of the
week, or on your birthday, or whenever. And you can have it only trigger
at night or during the day, or both.
So you want to do some really cool stuff, do you? Well,
you came to the right place. With a macro, you can control switches, play
sounds, take snapshots, send emails, and lots of other fun stuff. You can
do everything one right after the other if you like. When will this
happen, you might ask? You can set it up so that the macro starts when a
sensor is triggered, or at a particular time. If you set it up to run at a
particular time, you can have it run again and again on a particular day of the
week, or on your birthday, or whenever. And you can have it only trigger
at night or during the day, or both.
To understand a macro, just think of this: A macro will
sit around in a "monitoring" state where it watches all of its
triggers. Once the macro is triggered, then it is in an active state, and
it will process each action one at a time until they are all done. Once
all the actions have been completed, it goes back to a monitoring state
again. You can also set up a macro to only be active for certain modes or
to be inactive for certain modes, which makes it easy to control a lot of macros
for a few different situations. That's pretty much it, although there's a few more things on this
window, and a lot of explaining that has to be done about the types of triggers
and actions. So read on.
Macro Name and Description - These are for your benefit. The macro name is used when the macro is shown in a
list or on the activity log so you know which macro it is. So you may not
want to pick a name of "Fred" or "Kristina" unless it
reminds you about what the macro does. The macro name must be unique, so
you won't be allowed to name two macros the same. The name you choose for
your macro should be descriptive, but brief. If you want to be wordy,
that's what the description is for, although nothing will stop you from being as
wordy as you like on the name. But a long name will be more difficult to
see on the activity log or in a list.
Enabled - If you make a macro to annoy your spouse, you'll have lots of
fun, but I guarantee that you'll eventually have to make it stop. I know
this from experience. But if you want to keep it around for when you're
feeling nasty, you can just uncheck the "Enabled" check
box. The macro will be in a disabled state and will not monitor any
triggers. When you want the macro to be back in operation, just click the
enabled check box again.
Always
trigger on startup - When you first start up Home Domination, you may want to really
make an event out of it by flashing some lights, playing some sounds, and
whatever else you can think of. If you check the "Always
trigger on startup" check box, then this macro will start every
time the program starts. You don't have to add any triggers if you only want it
to execute on startup, however you can add a time trigger and have it run the
same macro every year on your birthday too if you like. Or perhaps have a
sensor trigger and have it trigger every time anyone comes to the front
door. Or all of the above.
Include on Main Window - When the "Include on Main Window" check box is
checked, the macro will show up on the main window under the macro tab.
From there, you can manually trigger the macro. If you have triggers set
up, it will also be triggered by those. If you can't think of any reason
to manually trigger this macro and you don't want it cluttering up the macro tab
on the main control window, then just uncheck this box.
Advanced - The "Advanced" button will bring up a dialog
where you can select stop sensors, which can be used to stop a macro when the
list of actions are time consuming and you want to stop it if a sensor is
tripped. It also allows you to choose what happens if a trigger is tripped
when the macro is in progress. This can either ignore the additional
triggers, or restart the macro. You can also set the access level of the
macro so only certain users will be able to trigger it manually. Click here
for more information about the advanced
dialog.
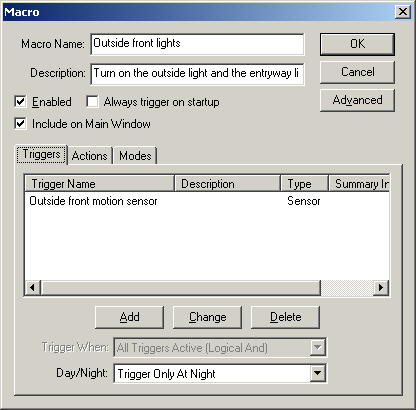
Triggers Tab
Triggers - Triggers deserve their own heading because
there's a lot
to learn about them. Here's the short version of it, followed by a link to
the long version. Your macro
will start as soon as a trigger (or multiple triggers - see Trigger
When) are tripped. A trigger can be a sensor trigger, where it will
watch for a certain X10 code to come through the wire, or a time trigger, where
it will start at a particular time. You don't need a trigger either if you
only plan on triggering it manually from the Macro tab on the main control
window or only triggering it on startup.
Clicking the "Add" button will display the windows for getting
the type of trigger and the information for the trigger. Double clicking
on a row
in the list box or selecting an item and clicking the "Change" button will display
the same window where you can change the information for that trigger. And
selecting a row in the list box and clicking "Delete" will
delete the trigger. Click here for the long
description of triggers.
Trigger When - "Trigger When" is only used when you have more than one trigger. Sometimes you may
only want a macro to be triggered by more than one sensor. In this case,
you may have two sensor triggers set up, and you would set the Trigger When to
"Any Triggers Active (Logical Or)". Or maybe you only want it to
be triggered on particular days of the week when a sensor sends a code.
Then you would set up a sensor trigger and a time trigger that triggers on the
appropriate days of the week, and you would set Trigger When to "All
Triggers Active (Logical And)" so it would only trigger when both triggers
were tripped. You may ask "What in the world do you mean by 'Logical
Or' and 'Logical And'? This guy's not logical at all!" Well,
that was put in there for us techy people who actually find that description
more meaningful than "Any Triggers Active" and "All Triggers
Active". Yes, we're a strange bunch.
Day/Night - This combo box lets you choose when
the macro can be triggered. If it is set to "Trigger Day or Night",
then it will only look at the triggers and not worry about whether it's day or
night. If it is set to "Trigger Only During the Day", then this
macro essentially goes to bed at night and won't wake up till the next morning
no matter how much trigger tripping goes on. If it is set to "Trigger
Only At Night", then it's a night owl and sleeps during the day.
Actions Tab
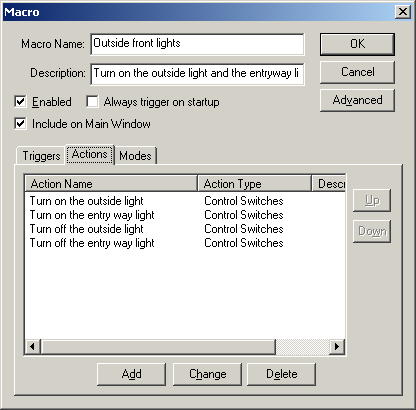 Actions - Actions are another of those things that deserve it's own
topic. So once again, I'll give you the short version here and link you to
the in-depth description. Actions are what is to be done when the macro is
tripped. You can have any number of actions you like. When a macro
is triggered, it starts processing
the first action and keeps going until it's done with the last action.
Once it's done, then the macro goes back into a monitoring state and doesn't do anything until
it is triggered
again.
Actions - Actions are another of those things that deserve it's own
topic. So once again, I'll give you the short version here and link you to
the in-depth description. Actions are what is to be done when the macro is
tripped. You can have any number of actions you like. When a macro
is triggered, it starts processing
the first action and keeps going until it's done with the last action.
Once it's done, then the macro goes back into a monitoring state and doesn't do anything until
it is triggered
again.
An action can control a switch, delay a certain amount of time
before the next action, play a sound, beep, send an email, alert a network client about something,
take a snapshot from a video source, control a Ninja (video motion device), run
another program, start or stop another macro, use FTP to transfer files to or
from a web site, or set the state of a mode. Click
here for the detailed description.
Click Add to add an action. Double click on an
item in the list to change it, or select the item and click Change.
Select the item and click Delete if you want to get rid of an
action. Select an item and click the Up or Down buttons to
move the action above or below another action.
Modes Tab
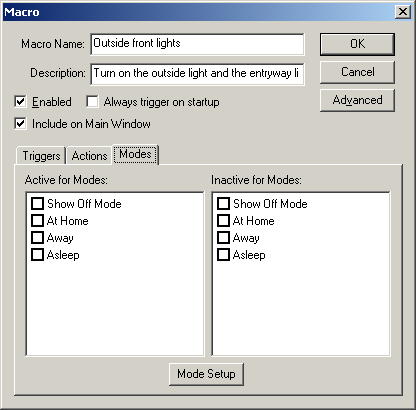 Modes are used as a convenient way to control multiple
macros. For instance, let's say your a young Casanova. On those rare
days when you don't have a hot date, you want a macro to run when you come into
a room which will turn the light on at full brightness so you can read the
latest women's magazines (after all, you can't become a young Casanova without
learning all of women's little secrets, and what better place to learn).
But on the days when the future super models visit, you want to run a macro that
turns the light on dim to set the mood. More than likely there will be
many macros that you want to run regardless of whether or not you're impressing
your lady friends, many macros you will want not to run (like the one that
sounds the chime when it's time for "Wheel of Fortune"), and some that
you'll only want to run when it's snuggle time.
Modes are used as a convenient way to control multiple
macros. For instance, let's say your a young Casanova. On those rare
days when you don't have a hot date, you want a macro to run when you come into
a room which will turn the light on at full brightness so you can read the
latest women's magazines (after all, you can't become a young Casanova without
learning all of women's little secrets, and what better place to learn).
But on the days when the future super models visit, you want to run a macro that
turns the light on dim to set the mood. More than likely there will be
many macros that you want to run regardless of whether or not you're impressing
your lady friends, many macros you will want not to run (like the one that
sounds the chime when it's time for "Wheel of Fortune"), and some that
you'll only want to run when it's snuggle time.
You may also have a different mode for security. So
when you leave the house, you could trigger a macro that would activate an
"away" mode. Macros could be set up that will only run in this
mode, and will use an activity trigger to monitor all the motion sensors in the
house and sound a siren if motion is detected and send an email to your cell
phone. When you get home, another macro can disable the mode, which will
disable the security macros. Another macro could be used to automatically
turn the mode on again while you sleep and off again in the morning before you
get up.
Active For Modes - This
list is used to choose what modes the macro is active for. If more than
one mode is chosen, the macro will be active if any of the modes is
active. If none of the modes are active, that macro will not
trigger. See Mode Setup for more information on
modes.
Inactive For Modes -
This list is used to choose what modes the macro should be inactive for.
If any of the selected modes are active, the macro will not trigger. See Mode
Setup for more information on modes.
Mode Setup - This is used to set
up a new mode or change an existing one. This is the same dialog that
appears when clicking the Modes button on the Setup
window. Mode Setup is where a mode is added. There isn't much to a
mode except for a name and a description, and it keeps track of whether the mode
is active or not. The list of modes show up on the Modes tab of the main
control window, where they can be turned on and off, and there is an advanced
action where a macro can turn a mode on or off based on a sensor trigger or time
trigger (for instance, your keychain remote could enable or disable a mode, or a
mode could be enabled or disabled at a specific time). Each macro can be
set up to be included for a mode, or excluded
for a mode. If a macro is neither included or excluded for a mode, it
functions as normal regardless of the state of any modes. If it is
included for one or more modes, then the macro will only run if one or more of
those modes are active. If it is excluded for one or more modes, then the
macro will be disabled if any of those modes are active.
As mentioned in the brief description of triggers, a trigger is
something that indicates when to start processing the actions. Or in
normal terms, it tells when to do stuff. You can have as many triggers as
you want.
Add - When you click the "Add" button, a small window
will pop up asking you for the Trigger Type. You currently have 4
choices. You can select a "Sensor Trigger",
"Time Trigger", "Group
Trigger" or "Activity Trigger".
Sensor Trigger - A Sensor
Trigger will watch a sensor. It can trigger when the sensor goes on, or
when it goes off, or even when it dims or brightens by a certain amount. Click
here for more detailed information on this type of trigger.
Time Trigger - A Time Trigger
will watch for a particular time to roll around. It can be a one time
thing, or it can be something that recurs on a regular basis. It can
trigger at a certain time, and on certain days of the week, or certain times of
the month, or once a year. There is a lot of flexibility with this, so
click here
to find out more.
Group Trigger - Sometimes you
may want to only trigger a macro on certain days of the week, but on those days,
you want any of several sensors to trigger the macro. To do this, you need
a combination of "Any Triggers Active" and "All Triggers
Active". What you would do is create a Group Trigger and add all the
sensor triggers under that group with a Trigger When of "Any Triggers
Active". When done adding triggers to this group, the group will appear in
the macro window as a single group trigger. Then you would add a Time
Trigger and select "All Triggers Active" for the Trigger When
field. Click here for more detailed information on this type of trigger.
Activity Trigger - This
trigger will monitor a group of sensors for activity. For example, let's
say you want to make sure the kids are home after school and you want to be
alerted if the kids have left. If you have enough motion sensors around
your house, there should be a flurry of activity while they're home. So
you can set it up so that if there is no motion from any of the sensors for a
period of time, then it will alert your remote network client that you have
running at work. You can also make a macro that will alert you when
activity is resumed. Click here
for more information about this type of trigger.
Once again, actions are things that can be done once the macro
is tripped. You can do many actions one after the other. It won't
start one action before another one finishes, although it is possible to have
two separate macros that are doing actions at the same time. But when
you're designing a macro, you should probably just worry about that macro.
The most commonly used action, and the most complex, is to Control
Switches. The Delay
Before Next Action action can be used to put a time delay between actions or
before the macro can be triggered again if used as the last action. There are two actions that can produce sound: Beep
and Play Sound. Two actions that can be used to
alert somebody is Send Email and Alert
Network Client. The Video Snapshots action
will snap a picture and store it on the hard drive. The Video
Motion action will let you control video motion devices like the
Ninja. There are advanced actions that can Run another
program, Start or Stop Another Macro, use
FTP to copy files to or from a website, and allow you to Set
the state of a Mode.
General
Control
Switches - This action lets you turn switches on, off, dim or brighten
them. You can also turn all lights on or off too. You can control
any number of switches and include two switching actions that can also be
repeated. Click here for
more information about this action.
Delay
Before Next Action - This action lets you set a delay before doing the
next action. This lets you put in a delay before the next action is done,
or if it's put in at the end, it delays when the macro can be restarted.
Click here for more
information about this action.
Sound
Beep - This action
lets you make the computer beep. You can select a variety of beeps.
Click here for more information about this
action.
Play Sound
- This action lets you play a .wav file. This can be a sound or an entire
song if you use something like Nero to get the song from the CD to your hard
drive. Click here for more
information about this action.
Email
Send Email
- This action lets you send an email. You can customize the email message
and even include some variable information. Click here
for more information about this action.
Remote Network Client
Alert
Network Client User
- This action lets you pop up a message box on the
network client program that a particular user is using, or on all network
clients that are connected, regardless of the user that is logged in. You
can customize the message that is displayed and even include some variable
information. Click here
for more information about this action.
Video
Video
Snapshots - This action lets you take snapshots or video clips and store
them to the hard drive. Click here
for more information about this action.
Video Motion
- This allows you to control video motion devices such as the Ninja, via a
macro.
Advanced
Run - This action is used to
run another program or to do other commands that can be done from the Start /
Run prompt via a macro. Click here for more
information about this action.
Start
/ Terminate Macro - This
action will let you start another macro, or terminate another macro that is
already running. This can be handy if you want one macro to trigger other
macros, or if you want to make sure another macro is not running when this macro
is running. Click here
for more information about this action.
FTP (Copy to/from a website) -
This action lets you use FTP to copy snapshots or other files to or from a
website or other remote location. Click here
for more information about this action.
Set Mode - This action will let you set a
mode to an active or inactive state. Each macro has the option of only
being active for certain modes, or to be inactive for certain modes. This
makes it easy to control a group of macros for a particular situation
(mode). Click here
for more information about this action.
Reboot PC
- This action is not currently available. This action lets you
reboot your PC. This can be handy if your computer is completely
unattended, and you want to reboot the computer periodically to prevent any
memory leaks from eventually overwhelming the system. Click here
for more information about this action.
Home Domination Home
Page