With the main control window, all the power of a James Bond nemesis is at your fingertips! So pet your kitty and laugh your most evil laugh and then read on.
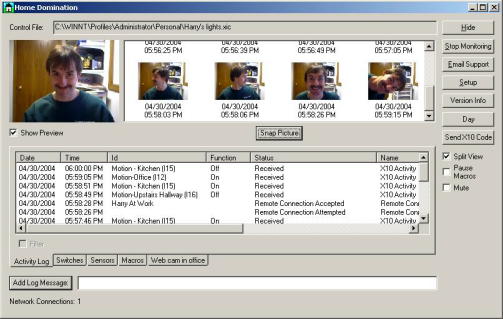
The main control window is your main control panel. The activity log will show you any X10 activity that's happening, as well as any macro or other activity. Once you have set up sensors, switches, macros or video sources, you can view and control them here from the various tabs.
This is a powerful window with a lot of stuff, although it was meant to be intuitive as well as powerful, so you should be able to just explore and use whatever you see. Use the index below if you want to learn more about any particular part. Remember, you will need to click the Setup Button in order to add switches, sensors, macros, or video sources. Until you do, those tabs will be empty and the program will not be very useful.
Buttons
Check Boxes
Tabs
Misc
Want to play hide and seek? When you click Hide, the
main control window will disappear. Don't worry, it's not a good
hider. An icon of a house ![]() will remain on the bottom right side of your
screen. If you double click on the house, or right click on the house and
select the "Open Main Control Window", the main control window will
reappear exactly as you left it. And don't worry, it's working even while
playing. When it is hidden, it continues to generate log messages and
process macros without interruption.
will remain on the bottom right side of your
screen. If you double click on the house, or right click on the house and
select the "Open Main Control Window", the main control window will
reappear exactly as you left it. And don't worry, it's working even while
playing. When it is hidden, it continues to generate log messages and
process macros without interruption.
One of the biggest questions you might have is "How do I stop this crazy thing!" This has purposely been made a little less easy than it is in most other programs because generally you will want this program to run continuously. Therefore, if you click the X in the upper right corner, it will just hide the window rather than shutting down the program and there is no OK button on the main screen that shuts down the program. However, if you really want to shut the program down, just click the Stop Monitoring Button. If you haven't saved the data file, it will give you an opportunity to do so before it closes. If it asks you if you want to save and you click cancel, the program will continue as it was. If you click yes, it will save it, and if you click no, it won't, but in either case it will continue shutting down. Anytime you click the stop monitoring button, it will ask you if you're sure you want to shut down. If you really don't want your lights to be controlled until you start the program up again, then click yes. If your response is "Oh my goodness, I can't live for even a moment without the power and convenience of this wonderful program, what was I thinking when I clicked this button?!", then worry no more. Simply click no and it will forget you ever had such rogue thoughts.
Want to sing the praises of this wonderful product? Do you find this product utterly confusing, frustrating, and you really want to yell at someone (I know, this sounds pretty ludicrous since this is such a wonderful product)? Do you need some help figuring out how to make it turn on the outside lights when there's motion, except when you're in the outside hot tub naked and you don't want the neighbors to see you? Do you think it's not doing something it's supposed to or doing something it's not supposed to? Do you have suggestions that will make this an even more wonderful product than it already is?
Well this button is for you. It will display a window that will allow you to compose and send an email directly to a Home Domination technical support representative. If your primary email program is running, you should be able to leave the user name and password fields blank. If not, either start your email program, or type in the user id and password of your email account.
In the message, make sure to be as descriptive as possible about any problems you are experiencing, and include as much contact information as you are willing to provide. If you do not give any contact information, we should still be able to reply via email. Your data file and log file will automatically be attached in order to assist with problem resolution. Don't worry, we won't tell anyone that you walk around outside naked before getting in the hot tub. Any information we receive will remain confidential and will only be used if the problem warrants it.
The Email Support Button does not appear on the Remote Network Client program.
Would you like this program to do anything? Well hey, if you're lucky enough to have your X10 interface hooked to COM1:, it will start logging X10 codes that are received without doing anything else. Unfortunately though, unless you are still fascinated by watching the second hand on a clock move, you'll get bored with this quickly. Fortunately the setup button is here to solve that little boredom problem forever.
The setup button brings you to a window where you can set up a data file that contains sensors to monitor, switches to control, and macros that monitor the sensors and control the switches or do a variety of other actions. You can set up video sources, set up user names so you can control access, set it up so it can monitor your email for command messages, set it up so you can access everything remotely from anywhere in the world in real time, set up port settings, logging options, and day and night options (including time zone). What the heck am I talking about, you might say? Well, read on.
Since most of the complexity of the product is hidden under this button, this topic is very large and is covered completely on its own series of pages. But don't worry, it's sure to bring you much fun and excitement. Click here for more info. Come on! Click it!! You'll never know how much fun you can have with this product until you do!
On the remote network client, the setup button does something quite different. It is used to provide information about the main program you are trying to connect to. There are a few settings for the remote program as well. Click here for more info.
"Hmm. I wonder if anything new has been added since I got the program."
Wonder no more, my friend! The Version Info Button can answer that question for you, and if you like what you see, it will make satisfying your curiosity as easy as pressing a button. This button displays a window that contains the version and build number of the program you are currently running. If you've updated the program via this window before, it will show you the date and time when you updated it. If you've ever clicked on the "Get Info" button, it will also have some information about the latest version and build, however this may not be up to date anymore. Click the "Get Info" button, and it will connect you to Home Domination's FTP site and download information about the most currently available version. The build number is always incremented when there is a newer version available, so if the build number is the same as the one next to "This Version", then you are running with the most current version.
After clicking the "Get Info" button, it will display the latest release notes. You can look through these notes to determine if you want to get the latest release. Generally, you should always get the latest version available unless you don't have any problems and you don't want to risk any changes. You may miss out on some cool new features that way however. To update the program, just click the "Update Now" button. Then sit back and watch it do its thing. It automatically downloads the necessary files and restarts the program when it's done. It may be shut down for as long as 10 seconds before starting back up again.
"Ahhh! What have I done! The program doesn't look exactly the same as it used to! And it's only 5 minutes to Wapner!"
If for any reason you want to go back to a previous version, you can. When it updates the program, it creates a directory whose name consists of the version and build number. It is put under a directory called "Backup" under the directory where Home Domination was installed. For example, if you installed Home Domination in C:\program files\HomeDomination, and the program version before you updated was Version 1.0, Build 100, then the following directory would be created:
C:\program files\HomeDomination\Backup\Version 1.0 Build 100
This directory will contain your data file and any program files that changed. To go back to this version, you just need to copy the files in your main directory to somewhere, just in case, and then copy the files from the backup directory over those in the directory where you installed Home Domination. You may want to try running it without copying your data file, however, because otherwise any changes you made since the file was backed up will be lost. And it's quite possible that the new data file will work with the old code. If not, it will inform you that it can't load it, in which case you won't have a choice but to revert to the backup file.
"I'm a very good driver."
"I know it's still daytime, but I want to get this party started now!"
Macros can be set up to only work during the day, or only at night, or both. Sometimes it's handy to have a macro only work at night, such as if you want lights to turn on automatically when you enter a room.
However there may be times when you want everything to operate as though it were night even though it's daytime. You can easily simulate night by simply clicking this button. If it's currently daytime, you can switch to night mode by clicking this button. Or maybe it's at night, and you have guests over that are sleeping in a room where the lights normally come on with motion. Click the button when it's in night mode and it will switch to day mode, and your guests will be able to sleep. If you change it to day mode at night, it will remain in day mode until the following night and if you change it to night mode during the day, it will remain that way until the following day.
But it's not healthy to party that long, so go to bed.
So you're sitting at your computer and you really want to dim your office light because you drank too much at your party the night before (see Day / Night Button). If you've added the switch under the setup window (Sensors and Switches), then you can turn it on and off by clicking the check box next to it on the Switches tab on the main control window. But it doesn't let you dim the light there. Or maybe there is some other X10 switch that you want to control one time only and don't want to bother adding it as a switch. This is the window for you.
This button displays a window where you can send raw X10 codes. This window lets you enter any house and unit code, and send any function and bright or dim amount. The functions available to send are "On", "Off", "Dim", "Bright", "All Units Off", "All Lights Off", and "All Lights On". If you click send, it sends the code immediately, and you can enter data for another code. If you hit OK, it sends the code and closes the window. The last settings will be saved if you hit OK. If you hit cancel, it will not save any changes you made to the items on the window.
Besides dimming the lights to calm your throbbing head, you may want to consider some aspirin or one of those aspirin substitutes that are too hard to spell; you know: acetominifinifin or ibuprophinectifin or something like that. I bet your headache just got worse.
Seeing double? Either you're still recovering from your party (see Day / Night Button), or you clicked the Split View check box.
This check box splits the main screen into two parts so you can view the information from two tabs simultaneously. The tab dialogs will be on the bottom and one of the tabs will be displayed on the top half. Initially, the log view is displayed on top. If you right click any tab, it will display a floating menu with "Show on Top", or "Create Separate Dialog". If you click "Show on Top", it will show that tab's information on top. It will remain in the tab view as well, but you can freely switch to any other tab. If you choose "Create Separate Dialog" after right clicking on a tab, a separate window will be created, and remain until you hit the Close button.
So you're Uncle Melvin and Aunt Bertha are in town and need to stay with you for a few days, but you have to take the digital clocks down in your house whenever they come over because technology makes them nervous. So if the lights turn on by themselves, they will surely bring in an exorcist. You could shut down the program, but you really want to know if they've been snooping around the house at night or while you're gone. So a better option is just to click the Pause Macros check box. Any X10 codes that are received are still logged, however no macro activity will happen (leaving the program as boring as described at the beginning of the Setup Button topic).
When you check the Pause Macros check box, it will ask you if you're sure you want to do that, since you may have a lot of cool macros, and you may go into serious withdrawal if they're not functioning. Click Yes, and ... nothing. As soon as Uncle Melvin and Aunt Bertha leave, you run to the computer and uncheck the Pause Macros button, and macros will be monitored again as though nothing happened. You may not have as easy of a time pretending nothing happened, especially after you review the log and determine that they looked in the closet where you keep your secret stash of ... I'll let you fill in the blank here.
One of the really nifty actions that you can do with macros is to play wave files or make the computer beep. However depending on how often the macro occurs, this may drive you nuts if you're near your computer for a long period. When your sanity is about to desert you, you can just click the mute check box, and silence and tranquility will fill the air. Click it again when you're sane again and sound will be restored.
If you ever want to know what's going on or what has gone on, this is where you go. This will contain a list of all X10 codes received. This could be X10 codes sent from motion sensors or remote controls. Any switches that are triggered remotely would show up here too. And all macro activity is also recorded here.
This information is stored in a file as well. There are cleanup options that you can set so this file doesn't threaten to overtake your whole hard drive. Don't worry, with today's hard drives being so large, it would take a really long time to fill it up even if you didn't have any cleanup. To set up the cleanup options for the log file, click the Setup button, then click the Log Setup button,
Each log entry contains the date and time it was received. The X10 computer interface buffers a couple items in it, so when you first start the program, it may look like a couple things just happened, but it was actually just received. The codes may have been sent through the wire a long time ago. After the program starts though, the date and time should be quite accurate since they are received as they happen.
Sometimes you want to see what happened for a particular sensor or switch. Click on a log entry of the sensor or switch you want to see, and the filter button will un-gray. Check the filter button, and it will only show the log items for that particular sensor or switch. If you have a motion sensor by your front door, you'll be able to see how many visitors you got throughout the day. Hopefully you won't be too disappointed if you weren't popular enough for any visitors to stop. Uncheck the filter box and it will show you all of the log records again.
The columns in this list can be resized by clicking on the lines separating each column and dragging them. If you double click on a separator line, it will make the size of the column to the left large equal to the longest line of data in that column. You can also rearrange these columns by clicking and holding the column name and dragging it to a new position.
The switches tab will show you all of the switches that you have set up. Actually, you can make it so switches added do not show up in this list however (see Sensors and Switches). Beside each row is a check box. This check box will be checked if the program thinks the switch is on, and it will be unchecked if it thinks the switch is off. Keep in mind that the status of the X10 switches cannot be retrieved, and the switches don't send a status when switched manually, so this may not always be correct.
If the check box is blank and you click it, it will send an X10 code to turn the switch on and the box will become checked. If the check box is checked and you uncheck it, it will send an X10 code to turn the switch off.
You can use this tab to torment the whole family! Just split the screen so you can see the log view too, and then when you see motion in a particular room, you can flash the lights at them! If you don't want anyone else to torment you, then see the Users button under the window that the Setup button pops up.
The columns in this list can be resized by clicking on the lines separating each column and dragging them. If you double click on a separator line, it will make the size of the column to the left large equal to the longest line of data in that column. You can also rearrange these columns by clicking and holding the column name and dragging it to a new position.
The sensors tab isn't quite as useful as the Switches tab, but it can be somewhat interesting. This will show the list of all the sensors that are set up, except for the ones you don't want to appear on this window. On the left of each row is a check box indicating if the sensor is on or not, and you can check it to turn them on or off. However, since they are sensors and not switches, they do not send the X10 code. Instead, changing the state of these will only cause macros that are monitoring them to trigger.
This tab does allow you to spy a little easier because by watching the check boxes, you can see what rooms had recent activity. That can help you determine what rooms to focus on when you want to mess with people's heads.
The columns in this list can be resized by clicking on the lines separating each column and dragging them. If you double click on a separator line, it will make the size of the column to the left large equal to the longest line of data in that column. You can also rearrange these columns by clicking and holding the column name and dragging it to a new position.
The macros tab lists all the macros you have set up except for the ones you didn't want to appear on this tab. Most macros have triggers, where when a trigger is tripped, the actions take place. However you can set up a macro with no triggers, and in that case, you can trigger them manually here. You can trigger any macro manually however even if they do have triggers.
Let's say you have a macro set up for when you have a hot date. You could have it trigger when a motion sensor by the front door is tripped, or you could just trigger it manually. It may turn on the lights outside of the house, turn on the entry way light, turn on another light on the way to the computer and dim it slightly, then turn on the light in the room where the computer is and dim it a little more. Then start playing a wave file of your most romantic song. You lead your awe inspired date down to the computer. And of course to really get the mood right, you show off this program and brag about your ability to annoy anyone in the house at will. Your date will be truly impressed by the power you possess.
The columns in this list can be resized by clicking on the lines separating each column and dragging them. If you double click on a separator line, it will make the size of the column to the left large equal to the longest line of data in that column. You can also rearrange these columns by clicking and holding the column name and dragging it to a new position.
This program just isn't quite the same unless you have video. Granted you can tell a lot from the log view, but compared to the pictorial that the video sources can provide, it's a little like reading brail.
The preview window can be turned on and off by the Preview check box. If you have a split window with the Video Sources on top (see Split View Check Box for how to get it there), and you have the Video Sources tab displayed, only one of them is allowed to have the preview window checked, so if you try to check them both, it will uncheck the other.
Next to the preview window, if it's displayed, is a list containing all the thumbnail views of the pictures taken. Below that is a Snap Picture button. If you click the Snap Picture button, it will display the picture in the list. You can also snap pictures by setting up a macro with an action of "Video Snapshot". That way you have a motion sensor near the camera, and snap a picture when anyone steps in front of it.
The thumbnail pictures are stored on your hard disk for a period of time as well. The location where these pictures are stored can be found in the window displayed by the "Video" button on the Setup window. Besides the location, there are a number of cleanup options that are available as well. That way, you won't have to have your hard drive fill up too full with all the fabulous pictures that are taken.
The columns in this list can be resized by clicking on the lines separating each column and dragging them. If you double click on a separator line, it will make the size of the column to the left large equal to the longest line of data in that column. You can also rearrange these columns by clicking and holding the column name and dragging it to a new position.
If you want to add your own message to the log, just type it into the box next to the "Add Log Message:" button, and click the button. The log message will appear in the log. You could do this to add comments into the log file, although the main reason you may want to do this would be if other people are connected via remote network clients attached, and you want to everyone attached to be able to see your message. So it can be used as a cheesy instant message thing.
The Control File field shows the name of the data file that is controlling the program. This will be blank until you save your data file the first time. If the data file has been changed since the last time it was saved, a "*" will appear between the text "Control File:" and the file name's edit box. If you exit the program (via "Stop Monitoring"), it will ask you if you want to save it. Otherwise, you can go under Setup and click the "Save" button to save the file.
The number of remote network connections that are currently attached to the main program is displayed on the bottom of the screen. So if the number is 5, that means that 5 people are currently looking at your stuff and maybe even can control them. This can only happen if you have remote networking enabled however. See the "Remote Setup" section under Setup to find out how to enable this. If you do enable it, you should also go under "Users" under Setup and add a user name, with appropriate rights, for everyone that you want to be able to access this program remotely.
Just remember that anytime you have your computer connected to the Internet for a long time, you should use a firewall. A firewall is a device, sometimes in combination with another device such as a router, which will prevent inbound access to your computer, but still allow outbound access. Without it, it's possible that a hacker could easily steal data from your computer or mess it up enough so it won't work.
If you do use a firewall, you will need to look up how to forward data destined for a particular port to your computer. See the "Remote Setup" section for more information on this.
"What genius decided to make this silly window so blasted small/big?" The window has to start out at some size, and it's somewhat small since if you are one of those people with the half inch thick glasses that need to have your screen in 640 by 480 video mode in order to see anything. If that's the case, you're probably wondering why it takes up so much of your screen. Otherwise, you probably want to know how to make the window bigger so more stuff shows up. In either case, fear not.
Just move your mouse to any of the edges, and you should see your mouse cursor change to an arrow when you're over the edge. Just click and hold the left mouse button while you drag the window to the size you want. It's probably easiest to click on the corners because they will let you size both the height and the width at the same time. But if you just want to adjust the height, then just click on the middle of the top or bottom edge and drag it. And if you just want to adjust the width, then click and drag the right or left side.