 A world of power and glory awaits you on this window! The wonder of
sensor monitoring! The marvel of switch control! The excitement of
automated macros! The splendor of video! The delight of email
monitoring! And the nirvana of remote access!
A world of power and glory awaits you on this window! The wonder of
sensor monitoring! The marvel of switch control! The excitement of
automated macros! The splendor of video! The delight of email
monitoring! And the nirvana of remote access!A world of power and glory awaits you on this window! The wonder of
sensor monitoring! The marvel of switch control! The excitement of
automated macros! The splendor of video! The delight of email
monitoring! And the nirvana of remote access!
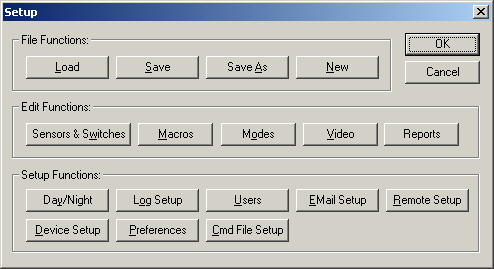
This window is separated into three basic categories: File functions, Edit functions, and Setup functions.
Normally, the only button you'll really need to use here is the save button, and if you're comfortable with waiting until you exit the program for it to ask you if you want to save your control file, you won't even need that button. However, since computers and software and electric company's are never 100% reliable, you may want to consider hitting Save after making a change, just in case you are not able to exit the program through the "Stop Monitoring" button.
The Load button will allow you to load another control file. Since the last control file used is automatically loaded when you start the program, this is not normally necessary. However, you can set up as many different control files as you like, so if you want to switch to a different one, you would click Load. Since only one control file can be used at one time, it may not be of much benefit to have more than one, however, if you're planning to make radical changes to a control file that's already working quite well, you may want to do a "Save As" before changing it. Then you can do a "Load" to switch back to the other one if you really hose things up.
When you click Load, it will stop processing any control file that's currently in use, load the selected control file, and start processing it immediately. Keep in mind that any macros that may have been running when you clicked load will not be completed.
If you don't want your hard work of setting the program up to go to waste, then the Save button is a good one to push. If you've never saved your control file before, it will act just like the "Save As" button. Otherwise, it will save it as the same name it was last saved as. This will also clear the "*" next to the Control File field on the main control window.
If you want to save to a different file name than what it was originally saved as, you would click the Save As button. It will let type in a new file name or browse for another file. The original file remains unchanged (unless you choose the same name), so this is a great way to make a backup copy. That way, if you screw it up badly, you can just Load the old file, and you're back in business.
If you want to create a whole new control file and start from scratch, you would click the New button. This will clear out any data in memory. If you had made changes that were not saved, it will ask if you want to save your changes before it will clear out all data.
This button will display a window where you can add your sensors and switches. Sensors are actually just a receiver of an X10 code, and a switch is simply something to send an X10 code. So a sensor can be a motion sensor or a remote control, or any other device that is capable of sending an X10 code through your house wiring. A switch can be any device that can be controlled by sending an X10 code through your house wiring, such as a wall switch, an appliance or lamp module, or a chime.
Click here for detailed information about this window.
This button will display a window that shows a list of macros and lets you add, change, delete or trigger them. If you want to the program to do anything by itself, either when sensors are tripped, or at certain times, or a combination of the two, then you will need to add macros. Don't be afraid of them. Once you see all they can do, you won't be able to get enough of them.
Click here for detailed information about this window.
This button will display a window that shows a list of modes and lets you add, change, or delete them. Modes are a convenient way to set up a state that may affect numerous macros. Each macro can be set up to be active or inactive when any mode is active.
Click here for detailed information about this window.
This button will display a window that shows a list of video sources and lets you add, change, or delete them. If you have an X10 video device or a web cam, you need to go here to let the program know you want to monitor them.
Click here for detailed information about this window.
This button will display a window that lists all of the reports that have been set up, and allows you to generate the reports. Reports can be customized as well by choosing the fields, the order of the columns, the sort order, etc.
Click here for detailed information about this window.
Macros can be set to work only during the day, or only at night or both. Plus, you can have a time trigger that starts or ends at dawn or dusk. This button will display a window that indicates how day and night are determined. You can have it monitor a sensor, or calculate it based on your latitude and longitude.
Click here for detailed information about this window.
This button displays a window with options for logging switch, sensor and macro activity. It includes options for cleaning up the log file periodically so it doesn't eventually eat up all your hard drive space.
Click here for detailed information about this window.
If you turn on remote access, you should also consider adding some user accounts. Otherwise anyone who knows your IP address, the TCP/IP port you are using, and has a copy of the remote network client will be able to control your lights. This isn't as big of a problem as it seems since the odds of someone stumbling onto all three of those things are very remote. However if you brag to a friend of yours about this wonderful program and maybe even supply this information to him so he can try it out, he might decide to annoy you day and night. If that happens, you will want to add a user and password. You may add one for him too but restrict his rights so he can't turn your lights on when you're trying to sleep. Or just add an account for yourself and don't let him know the user name and password, and you're all secure again.
Click here for detailed information about this window.
You can set it up so it will monitor your email for commands. You choose the subject line that command emails must have. It will ignore all other emails. When if finds a command email, it will parse through it looking for commands, and then it will perform whatever actions were requested and reply with a list of what it did, or if there was anything in the message that it didn't understand. On this window you can also set up the SMTP server, which is used by the Send Email action.
Click here for detailed information about this window.
If you don't go into this to turn on remote access, then you won't be able to use the network client. Nobody else will either. When you turn this on, you need to select a TCP/IP port to use, and any network client also needs to use this port, along with the TCP/IP address of your machine. If you enable this, you may want to consider adding users and passwords because otherwise anyone with your TCP/IP address, port number, and the network client program will be able to have full access of your lights. If you have a firewall, you will need to forward that port to your machine or nobody outside will be able to get past your firewall.
Click here for detailed information about this window.
In order for your computer to have any control of your lights, you'll need some kind of device. The Device Setup window lets you indicate which of these devices are connected to your computer and lets you set up each device. If you have a CM11A device attached, you can select that device and then click Add to add that device (if it's not already there). Then you can click on the device and edit it, and click the Port Setup button if you need to set up the port to use.
Click here for detailed information about the device setup window.
This will bring up a window where you can set up general preferences, such as whether or not the icon on the lower right side of the screen will flash when there is activity or not, or whether the program will be hidden when it first starts. You can also set it up to automatically update if new versions of the program are available.
Click here for detailed information about this window.
This will bring up a window where you can set up command file monitoring.
Click here for detailed information about this window.