Hardware Setup
 Home Domination can support several types of 1-Wire temperature sensors from Dallas Semiconductor.
Currently, the DS18S20, DS18B20 and DS1822 are supported.
Home Domination can support several types of 1-Wire temperature sensors from Dallas Semiconductor.
Currently, the DS18S20, DS18B20 and DS1822 are supported.
Techy Tidbit: The DS18S20 and DS18B20 are accurate to +- a half degrees
Celsius. The DS1822 is less accurate, within +- 2 degrees Celsius, but is cheaper. The DS18S20 reports the temperature in half degrees
Celsius (roughly 1 degree Fahrenheit) and the DS18B20 and DS1822 report the temperature in 16ths of a degree
Celsius (about a 10th of a degree Fahrenheit).
To attach the temperature sensor to the computer, you'll need to attach it to one of the USB interfaces devices from USBmicro: U401, U421, U421-SC3, or U451. They all work identically, however the U401 is in a "SimmStick" format which is about a
1 inch (26 mm) wide by 3.5 inches (88 mm) long. The U421 is in a "DIP-like" format, which is
about 3/4 of an inch wide (19 mm) by about 1.5 inches long (38
mm). The U421-SC3 is identical to the U421 except that it has a screw terminal soldered onto it so you can attach temperature sensors without having to solder.
To use the screw terminals, you'll need a very small screw driver
like the kind you use on eye glasses. The U451 is a very handy version which has two relays on the board and screw terminals for attaching to them. It also has 6 other pins that could be attached to additional external 5V relays.
First, you'll need to find out which pins on your temperature sensor are the
Power (VDD), which is the
Ground (GND) and which is the Data pin (DQ). Use the following links to get to the technical information for your temperature sensor.
Temperature Sensor |
Data Sheet |
DS18S20 |
|
DS18B20 |
|
DS1822 |
|
Then you'll need to solder the temperature sensors to the
appropriate pins of the U4x1, U421, or U451 or you can use the screw terminal on the U421-SC3 or solder it into one of the other pins. See the section below for the USBmicro device you have to determine what pins to use.
You can attach multiple temperature sensors to the same data
pin (with version 148 or greater of Home Domination). So in the case of the U421-SC3, you can attach multiple temperature sensor devices using the same screw terminal. Also, if you want to have several temperature sensors throughout the house, you can attach them to the same wire in different locations.
According to Dallas Semiconductor's 1-Wire documentation, the
distance can be up to 300 meters with a suitable master circuit.
If you purchase a USBmicro device on or after January of 2006 (firmware version 1.46 or greater) you can wire all the temperature sensors at once, and when you install them in Home Domination, all of the devices on the wire will be listed, and you select each one. If you have an older USBmicro device, you can still use multiple temperature sensors on a single wire, but you will need to attach them one at a time and add them into Home Domination, making sure to select the ID that it reads. Once all the temperature sensors you intend to use on the wire have been individually added to Home Domination, you can then wire all the temperature sensors to the same data pin.

Pin 1 on the U401 is located on the left, as you look at the board in the orientation above. Pin 30 is the pin on the far right.
Note that all lines extend from J1 to J2. There are then some J1 lines that only connect to J2, and no other circuitry.
| Description |
Pin |
| Power |
7 |
| Ground |
9 |
| Data Pin -
Port A, Bit 0 |
15 |
| Data Pin - Port A, Bit 1 |
16 |
| Data Pin - Port A, Bit 2 |
17 |
| Data Pin - Port A, Bit 3 |
18 |
| Data Pin - Port A, Bit 4 |
19 |
| Data Pin - Port A, Bit 5 |
20 |
| Data Pin - Port A, Bit 6 |
21 |
| Data Pin - Port A, Bit 7 |
22 |
| Data Pin - Port B, Bit 0 |
23 |
| Data Pin - Port B, Bit 1 |
24 |
| Data Pin - Port B, Bit 2 |
25 |
| Data Pin - Port B, Bit 3 |
26 |
| Data Pin - Port B, Bit 4 |
27 |
| Data Pin - Port B, Bit 5 |
28 |
| Data Pin - Port B, Bit 6 |
29 |
| Data Pin - Port B, Bit 7 |
30 |
See http://www.usbmicro.com/odn/index.html for additional information.

Except for the screw terminal, the U421 and U421-SC3 are
exactly the same. Pin 1 on the U421 is located on the lower left, as you look at the board in the orientation above. Pin 24 is the pin on the upper left. The lower row therefore is 1-12, the upper row is 24-13.
| Description |
Pin |
| Power |
14 |
| Ground |
9 |
| Data Pin - Port A, Bit 0 |
1 |
| Data Pin - Port A, Bit 1 |
2 |
| Data Pin - Port A, Bit 2 |
3 |
| Data Pin - Port A, Bit 3 |
4 |
| Data Pin - Port A, Bit 4 |
24 |
| Data Pin - Port A, Bit 5 |
23 |
| Data Pin - Port A, Bit 6 |
22 |
| Data Pin - Port A, Bit 7 |
21 |
| Data Pin - Port B, Bit 0 |
5 |
| Data Pin - Port B, Bit 1 |
20 |
| Data Pin - Port B, Bit 2 |
6 |
| Data Pin - Port B, Bit 3 |
19 |
| Data Pin - Port B, Bit 4 |
7 |
| Data Pin - Port B, Bit 5 |
18 |
| Data Pin - Port B, Bit 6 |
8 |
| Data Pin - Port B, Bit 7 |
17 |

Temperature sensors can be connected to Port A, bits 0 - 7. Port B, bits 0 and 1 control the
on-board relays, and Port B, bits 2 - 7 can be tied directly to additional external 5V relays.
See http://www.usbmicro.com/odn/index.html for additional information.
To add a temperature sensor to Home Domination, it's best if you have a temperature sensor already connected to a USBmicro
USB controller and have the USBmicro controller plugged into the
computer before starting Home Domination.
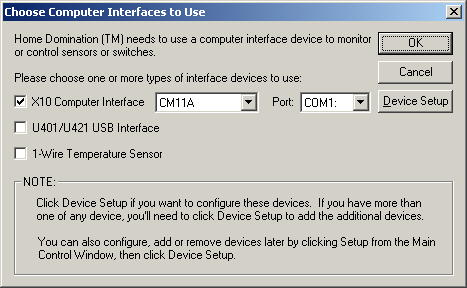 If
you're creating a new control file, on the "Choose
Computer Interfaces to Use" dialog, simply check the
"1-Wire Temperature Sensor" check box. This will
add a temperature sensor using the first USBmicro device it
finds, using data bit 5 (the one that the screw terminal is set
up for on the U421-SC3). It will also add a sensor so it
will appear in the sensors tab. If you need it to use a
different USBmicro device or a different data bit, then click
the Device Setup, look for the "Temperature Sensors (1-Wire)"
line, click the + so the devices show, select the device, and
click Change. Here you will be able to change the device
or pin that is used, and you can also change whether it uses
Celsius or Fahrenheit, and you can change how often it checks
for temperature changes. It takes about a second for it to
read the temperature, so you cannot check the temperature more
than once per second.
If
you're creating a new control file, on the "Choose
Computer Interfaces to Use" dialog, simply check the
"1-Wire Temperature Sensor" check box. This will
add a temperature sensor using the first USBmicro device it
finds, using data bit 5 (the one that the screw terminal is set
up for on the U421-SC3). It will also add a sensor so it
will appear in the sensors tab. If you need it to use a
different USBmicro device or a different data bit, then click
the Device Setup, look for the "Temperature Sensors (1-Wire)"
line, click the + so the devices show, select the device, and
click Change. Here you will be able to change the device
or pin that is used, and you can also change whether it uses
Celsius or Fahrenheit, and you can change how often it checks
for temperature changes. It takes about a second for it to
read the temperature, so you cannot check the temperature more
than once per second.
 If
you already have a control file set up, you'll need to go
under Setup, then click Device Setup, select the "Temperature Sensors
(1-Wire)" line, and then click the Add button. This
adds a temperature sensor device that uses the first USBmicro
device, and data bit 5. To change this, click the + button
to show the devices, highlight the device and click the Change
button. Then change the USBmicro device or the data bit to
use, or whether to use Celsius or Fahrenheit, and you can change
how often it checks the temperature.
If
you already have a control file set up, you'll need to go
under Setup, then click Device Setup, select the "Temperature Sensors
(1-Wire)" line, and then click the Add button. This
adds a temperature sensor device that uses the first USBmicro
device, and data bit 5. To change this, click the + button
to show the devices, highlight the device and click the Change
button. Then change the USBmicro device or the data bit to
use, or whether to use Celsius or Fahrenheit, and you can change
how often it checks the temperature.
If you want to use multiple temperature sensors on a
single data pin, each temperature sensor will have to be
added as a separate temperature sensor device, but you will
specify the same USBmicro device and data pin. In order
for it to work correctly however, you will need to assign the
specific device id for each temperature sensor.
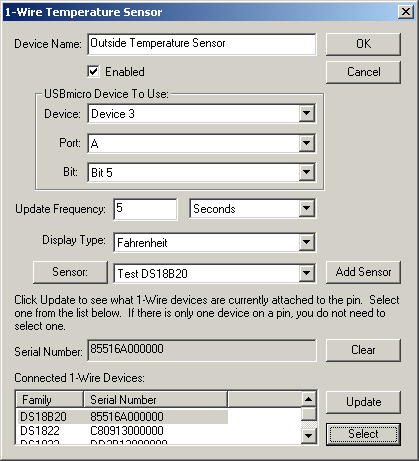 If
you have a USBmicro device that was purchased on or after
January of 2006 (firmware version 1.46 or greater), when you
can click change on a specific temperature sensor under the
"Temperature Sensors (1-Wire)" line, it will show you
the ids of all the 1-Wire devices that are connected to a
particular data pin. If you change pins, you will need to click
the Update button to rescan the device. Select a serial
number in the "Connected 1-Wire Device" list and click
Select. This will instruct Home Domination to use that
particular sensor when checking its temperature. Each
temperature sensor should select a different serial number to
use.
If
you have a USBmicro device that was purchased on or after
January of 2006 (firmware version 1.46 or greater), when you
can click change on a specific temperature sensor under the
"Temperature Sensors (1-Wire)" line, it will show you
the ids of all the 1-Wire devices that are connected to a
particular data pin. If you change pins, you will need to click
the Update button to rescan the device. Select a serial
number in the "Connected 1-Wire Device" list and click
Select. This will instruct Home Domination to use that
particular sensor when checking its temperature. Each
temperature sensor should select a different serial number to
use.
If you have a USBmicro device that was purchased prior to
January of 2006 (with a firmware version < 1.46), you can
still use multiple temperature sensors on a single wire, but
it's more difficult to set up. You will need to only
attach one temperature sensor to the wire at a time until Home
Domination has the serial number for each device selected.
To set up temperature sensors, you would still add a separate
temperature sensor device for each device on the wire, but you
must do it one at a time. This will read the serial number
of the device on the wire, and then you can select it.
Then you would remove that device from the USBmicro device,
attach the next temperature sensor to use, edit your next
temperature sensor device in Home Domination and select the
serial number to use (it can list only one). Once all of
the temperature sensors have individually been set up, then you
can attach all of the temperature sensors to the same wire, and
it will use the previously detected id to individually address
each temperature sensor.
You can change the name of the temperature sensor that gets
added by clicking change on the Sensors tab, or you can do this
under Setup and click Sensors and Switches.
You can use this sensor in macros too. If you want a macro
to act as a thermostat, you should set up two macros--one to
turn a heating device on when it's below a certain temperature,
and another to turn the device off when it's above a certain
temperature (and vice-versa if it's controlling a cooling
device).

