Device Setup
 In
order for Home Domination to be able to control anything in your home, you must
first have a device that can be plugged into your computer which can send and
receive X10 codes through your household wiring, or you need to have a device
that can control switches directly. The Device Setup window is where you
can configure these devices.
In
order for Home Domination to be able to control anything in your home, you must
first have a device that can be plugged into your computer which can send and
receive X10 codes through your household wiring, or you need to have a device
that can control switches directly. The Device Setup window is where you
can configure these devices.
At the time this help page was last updated, the following
devices were available: CM11A, DS18S20/DS18B20 Temperature Sensors, and
U401/U421/U421-SC3/U451 Direct I/O.
The CM11A device is a common device for sending X10
codes. You can only have one of these devices attached, so the Add button
will be grayed after one device is added. If you have this device, and it
is not already added, then you can click on the CM11A (X10 Computer Interface)
item, then click the Add button. This will add an entry called
"Device 1". This can be renamed, or the port changed, by
clicking on Device 1 and clicking Change
to set the properties for the device.
If you have any DS18S20 or DS18B20 temperature sensors,
you can click on the "Temperature Sensors (DS18S20/DS18B20)" item and
then click the Add button for each of these. Then click on each device and
click Change to
edit the properties of this device. You can change the name of this
device, as well as numerous other options related to these sensors. It
will automatically detect whether you are using a DS18S20 or DS18B20, so you
won't need to indicate that.
If you have any U4x1 devices, these will be added
automatically if you have them plugged in. However, you can also add them
by clicking on the "U4x1 Direct I/O" entry and click Add.
Clicking Change will allow you to
change the name of the device and let you enable or disable it.
The ADLINK ACL-7122 Direct I/O device can also be used to
control low voltage wiring. This is a card that can be installed in the
computer, and an additional driver needs to be installed in order to make use of
this. If you have this device, you can select the ADLINK ACL-7122 Direct I/O
item and then click Add. This will add the device. Then click
Change if you want to change the device
name or enable or disable it.
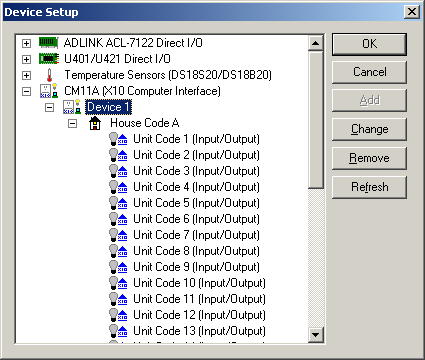
House and Unit Codes / Port or Pins
When a CM11A device is added, then the next level in the tree
will contain all the house codes that can be monitored or controlled by the
CM11A. Beneath each house code is a list of unit codes that can be
monitored or controlled. If you click on a unit code and click Change,
it will let you set up whether the the unit code is to be used as input, output,
or both, and it will let you set up logical sensors for these codes. It is
not necessary to do this here since you can add sensors or switches from several
other places in the program as they are needed, however you're welcome to set
them up here. This may be more convenient to do this here if you have a
list of all your sensors and switches and the house and unit codes for each.
If you are using a U4x1 device, you
will need to set whether each pin is input or output so it knows how to
initialize the device, so after you've added a device, you will need to expand
the port and pin settings, and select each pin and click Change
to set whether it is input or output and whether the value of the pin represents
on or off. If the pin is already used by a 1-wire device you will get a warning
dialog instead. If the pin is not actually used by a 1-wire device,
then you would need to correct the 1-wire device that is indicating that it uses
the pin.
The some properties of the port for the U4x1
devices can also be set. Click on the port and then click Change
to edit these properties.
Home Domination Home
Page