Sensors and Switches
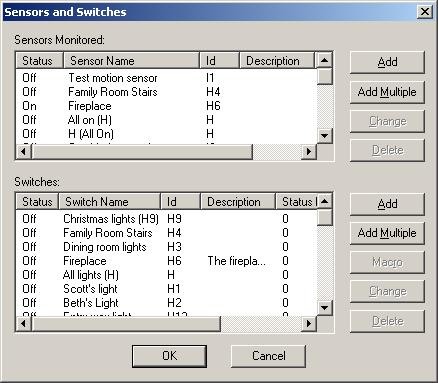 This is where you can add your sensors and switches. Sensors are
actually just a receiver of an X10 code, and a switch is simply something to
send and X10 code. So a sensor can be a motion sensor or a remote control,
or any other device that is capable of sending an X10 code through your house
wiring. A switch can be any device that can be controlled by sending an
X10 code through your house wiring.
This is where you can add your sensors and switches. Sensors are
actually just a receiver of an X10 code, and a switch is simply something to
send and X10 code. So a sensor can be a motion sensor or a remote control,
or any other device that is capable of sending an X10 code through your house
wiring. A switch can be any device that can be controlled by sending an
X10 code through your house wiring.
Sensors and switches do not necessarily have to be limited to X10 devices
however. Click here if
interested in supporting an IO board.
The columns in the Sensor and Switch lists can be resized by clicking on the
lines separating each column and dragging them. If you double click on a
separator line, it will make the size of the column to the left large equal to
the longest line of data in that column. You can also rearrange these
columns by clicking and holding the column name and dragging it to a new
position.
To add a sensor:
To add a sensor, just click the Add button next to the sensor list. If
you have a whole bunch of sensors you want to add, then click the Add Multiple
button.
After clicking the Add button. If more than one type of sensor is
available, it will ask which type you would like. Then it will display a
window where you can enter information about the sensor. If only one type
of sensor is available to you, it will go directly to the window where you can
enter information about the sensor.
Click here
for more information on the window that appears for X10 sensor settings.
Click
here for information on the window that appears for IO Sensor settings.
After clicking the Add Multiple button, the exact same thing happens as when
you click the Add button. However, after clicking OK on the window where
you can enter information about the sensor, it adds the sensor and then
immediately displays the window for the same type of sensor as the one
before. You can keep adding sensors for as long as you like. When
you're done, hit Cancel on that dialog instead of OK.
To change or delete a sensor, click the item in the list you wish to close or
delete, and then click the appropriate button. If you highlight multiple
items in the list, and you click Change, it will pop up the info window for each
item, one at a time. If you click delete after highlighting multiple
items, it will delete all of the highlighted items. You will always be
asked if you're sure before the items are deleted.
To add a switch:
To add a switch, just click the Add button next to the switch list. If
you have a whole bunch of switches you want to add, then click the Add Multiple
button.
After clicking the Add button, if more than one type of switch is available,
it will ask which type you would like. Then it will display a window where
you can enter information about the switch. If only one type of switch is
available to you, it will go directly to the window where you can enter
information about the switch.
Click here for
more information on the window that appears for X10 switch settings.
Click
here for information on the window that appears for IO switch settings.
Click here for information on the window
that appears for IO paddle switch settings.
After clicking the Add Multiple button, the exact same thing happens as when
you click the Add button. However, after clicking OK on the window where
you can enter information about the switch, it adds the switch and then
immediately displays the window for the same type of switch as the one
before. You can keep adding switches for as long as you like. When
you're done, hit Cancel on that dialog instead of OK.
If you would like to add a macro that is triggered by a particular sensor and
controls a particular switch, just click the appropriate items on the sensor and
switch lists, and then click the Macro button. This will display a Quick
Macro window which will give you limited options for creating a simple
macro. On that window, however, you will be able to click the advanced
button which will provide you will all the powerful features that macros can
provide.
To change or delete a switch, click the item in the list you wish to close or
delete, and then click the appropriate button. If you highlight multiple
items in the list, and you click Change, it will pop up the info window for each
item, one at a time. If you click delete after highlighting multiple
items, it will delete all of the highlighted items. You will always be
asked if you're sure before the items are deleted.
Home Domination Home
Page